Being gluten free is easier than you think...

Being gluten free seems difficult, if not impossible, at first but it's easier than you think. I'll explain how.
Follow Me on Pinterest

Thursday, May 31, 2012

Recipe: Strawberries and Cream Pie

Lately I've been on a pie making kick. My goal is to make a kick-ass crust that is both gluten free and tastes good. I think I've succeeded. Now, I just need to figure out how to transfer it from the parchment paper to the pie plate without it looking like a complete mess. I'll keep working at it until I get it right. There's nothing I like better than a baking challenge. It's almost summer time and there are a bunch of berry and fruit recipes that I would like to try.
Last week I bought some strawberries from an office fundraiser. They came from my coworker's pick-your-own farm. Wegmeyer Farms.  In the summer he has berries and in the fall he has pumpkins and gourds. If you're in the Loudoun County area stop by the farm, I'm sure they'd love to see you.

Since I had a whole quart of strawberries I decided to try the strawberries and cream pie recipe that I found at allrecipes.com. I've adapted it a bit to make it gluten free but I imagine it to be just as yummy as it's wheaty counterpart.

This recipe takes a bit of time but that's only because it needs to be chilled for about 4 hours.

I made two pies* by doubling the recipe.

Strawberries and Cream Pie
Prep time: 20 mins
Bake time: 10-15 mins
Refrigerate: 4 hours
Serves: 8

Pie crust:
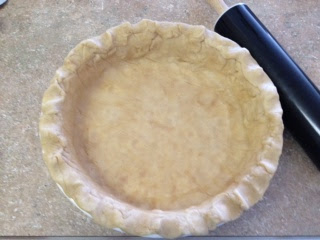
Follow directions for Bob's Red Mill pie crust from my Strawberry Rhubarb Pie recipe.
* If you're going to make two pies make two batches of this crust. I tried to split the dough and make two crusts out of it but I ended up with a really thin and brittle crust.

Filling:
Ingredients
  • 4 ounces cream cheese, softened (I used the pre-whipped kind)
  • 2 tablespoons sugar
  • 1/2 teaspoon vanilla extract
  • 1/2 cup mashed fresh strawberries
  • 1/2 cup heavy whipping cream
  • 2 tablespoons confectioners' sugar
Directions
  • In a small mixing bowl, beat the cream cheese, sugar and vanilla until smooth. Stir in the strawberries. In another small mixing bowl, beat cream until it begins to thicken.
  • Gradually add confectioners' sugar, beating until stiff peaks form. Fold into the cream cheese mixture. Spoon into the crust. Refrigerate for 4 hours or overnight
If you prefer you can skip making your own whipped cream and just fold in a small tub of ready-made whipped cream. It'll turn out just fine. If you do decide to use the ready-made whipped cream you won't need the heavy whipping cream or the confectioners' sugar. 

The result is a completely creamy, strawberry-y, delicious little bit of summer heaven.

Suggestion: when you're buying strawberries from the grocery store, farmer's market, or Wegmeyer Farms stop and smell them before you put them in your basket. They should smell sweet and have a dark red color. These berries are the sweetest and will add that much more flavor to your pie. If you don't smell anything when you're sniffing them, put them back. Those are likely to have less flavor and sweetness. And last but not least, don't discount the small berries, sometimes those are the ones that pack the biggest flavor punch.

Until next time...
Enjoy!
 

Wednesday, May 30, 2012

Recipe: Gluten Free Granola

Saturday was a busy day. DH and I got up early and went for a bike ride. It had been awhile since we'd been riding and I wanted to test out my new bike. Friday night we went shopping for a new bike for me. The one I had been riding weighed a ton and I didn't like riding it all that much. Fortunately it wasn't hard to find a lighter one. After the ride I did some standard weekend chores. I wanted to get things done so that we could enjoy the rest of the weekend.
In addition to all the goings on Saturday morning DH, Kiddo, and I went to the drive-in to watch Men in Black 3 and Dark Shadows. There is exactly one drive-in movie theatre left in my area. It's in Stephens City, VA. It's called The Family Drive In Theatre. If you get the chance to go, do it. Seriously. Their snack bar isn't totally gluten free but they do have some pretty awesome gluten free choices. They have french fries, corn dogs, candy, and popcorn. Not the healthiest of fare but still pretty good.
Planning ahead, I wanted to bring at least one snack with us that was guaranteed to be Gluten Free. I knew they'd have popcorn, after all you can't watch a movie without it, so I decided to make granola. Granola is another one of those things that DH hasn't had in awhile and misses. The recipe is really simple and like most other things that I make, it doesn't take a whole lot of time to do. I adapted the recipe from my favorite Iron Chef, Michael Symon. I'd post a link to it but I grabbed it off of  his Facebook page when he posted it. If you want to try to find it he called it Lizzie's Granola.

Gluten Free Granola
Ingredients: 
4 cups Gluten Free rolled oats. I used Bob's Red Mill quick cooking rolled oats
2 cups sweetened coconut 
2 cups almonds 
1 cup cashews 
3/4 cup olive oil 
1/2 cup honey 
2 tsp cinnamon 
1 tsp kosher salt
2 cups Craisins
2 cups dark chocolate peanut butter m&ms

Directions: 
Toss all ingredients (except for the Craisins and M&Ms) together to coat and bake on sheet tray at 350 for 30 minutes..or until golden..let cool completely in pan..add 2 cups of Craisins and and 2 cups of your choice of m&m's and serve or store in airtight container. 

I should have only baked mine for about 20-23 minutes as my oven runs hot. The edge pieces of my granola were a bit burnt but that's ok. It was still very yummy. Feel free to toss in any type of nut or dried fruit that you like.

Rule of thumb: If you can smell what you're baking then pull it out of the oven because it's about to burn. I've learned over the years that if there is a strong scent in the air of whatever it is that I'm baking that I need to hop-to and pull that treat out of the oven because it's almost ruined.

Remember: most baked goods will continue to cook a little bit even after they're taken out of the oven.


I'm looking forward to making this one again but with different nuts and fruits. 


Enjoy!

Monday, May 28, 2012

Recipe: French Silk Pie

Happy Labor Day Everyone!
I hope you all have had a wonderful weekend. The family and I had a definitely did. It was chock full of fun activities and a little bit of doing nothing. I also happened to do a lot of cooking and baking this weekend...not that I minded one little bit. There is nothing better in the world than making friends and family smile. The way I see it there is only one surefire way of making that happen and that's to feed them delicious food.

My weekend started last Thursday. I had to leave work a little early because I had some errands to run. So, I had a bit of time before my hubby came home from work and I thought I would make him his favorite pie...French Silk.

This recipe is so very simple to make and so worth every single calorie. This recipe has been adapted from a recipe of I retrieved from Faithanne on Bakespace.

Crust:
  • 1-1/2 cups GF All Purpose Baking Flour (I recommend using Bob's Red Mill GF AP Flour and not Mama's Gluten Free Almond Blend)*
  • 1/4 tsp xanthan gum + a little extra
  • 1/2 tsp Salt
  • 1/2 cup Margarine (one stick)
  • 1 Tbsp Vanilla (if you can, use the real stuff not the imitation)
  • 4 Tbsp Cold Milk
Directions:
  • Preheat the oven to 400.
  • Mix all ingredients together. To make the job a bit easier cut the margarine into small cubes before mixing the dough together with a pastry blender or fork.  To show you just how well I follow directions I just realized as I was typing this that I've been using butter and not margarine sticks. Don't do what I did. Use margarine and not butter. Using butter sounds like a good idea but it makes the pie crust gooey and difficult to press into the pie pan. 
  • Add the vanilla and milk one tablespoon at a time until you have incorporated all of the liquid. The dough might be a little dry and that's ok. I found that it works well to continue to work the dough with my hands (yes, I washed them first) until all of it came together.
  • Place dough in between two pieces of parchment, flatten the dough with your hand, then roll out to the appropriate size with a rolling pin. Be careful not to roll it out too thin.
  • Remove the dough from the parchment. This might not be easy. The dough might be a little sticky in some places. That's ok.
  • Press dough into the pie pan and poke holes in the dough to allow steam to escape while baking. This will keep the crust from bubbling. 
  • Bake for 10-20 minutes depending on whether or not your oven runs hot or not. Mine does so 10 minutes is good for me. The crust should be nicely browned.
  • Let the crust cool completely before adding the filling.
Use a stoneware pie pan whenever possible. Not glass like I did.
Filling: 


  • 1/2 cup butter, room temperature


  • 3/4 cup sugar
  • 2-oz semisweet or bittersweet (60% cacao) chocolate, melted and cooled**
  • 1 tsp vanilla extract
  • 2 large eggs, room temperature 
  • Directions:In a large mixing bowl (or the bowl of an electric mixer), cream together butter and sugar until light and fluffy. Beat in chocolate and vanilla extract.
    Add in one egg and beat at medium speed for 5 minutes (I prefer the paddle to the whisk if you’re using an electric mixer). Scrape down sides of bowl. Add in the second egg and beat for an additional five minutes. Mixture should be very light and smooth.
    Pour into pre-baked pie crust and smooth with a spatula.
    Refrigerate for at least 2 hours before serving, until firm.
    Serve cold, with whipped cream and chocolate shavings, if desired.


    Makes 1 pie. Serves 8.

    Again, I failed to follow directions and didn't see that I was supposed to beat each egg into the chocolate mixture for 5 minutes each. What I did was to let the mixer run for longer after I added the 2nd egg. It still turned out just fine.

    *Mama's gluten free almond blend flour is wonderful to bake with. I did find that it produces a crispier crust. If you prefer your pie crusts crispier I say go for it. If you want a thicker crust stick with using Bob's Red Mill Gluten Free AP flour. Definitely don't forget to add the xanthan gum. 
      
    ** I did this in a double boiler on my stove. To me it's worth the extra time for a smoother finish. The original recipe calls for 1 ounce of chocolate. 1 ounce of chocolate is definitely not enough in my book so I doubled the amount. 


    To finish off the pie I took Faithanne's advice and added a dollop of whipped cream to the pie before hubby and I dived in. Hubby liked it so much he took some to work with him to share with his coworkers. The report was that it was a hit there too. 


    Delicious, decadent, creamy, and chocolatey. Who could ask for more? 


    Bon Appetite

    Thursday, May 24, 2012

    Product: Udi's Gluten Free Bagels

    This tasted much better than it looks.
    Earlier this week DH and I decided that we wanted  to have steak and cheese sandwiches for dinner. It had been awhile since DH had had a steak and cheese sandwich. Come to think of it, I can't remember the last time I had one either. So, we thought that having a gluten free steak and cheese sandwich for dinner would be good...and it was!

    This was really simple to make. You will need the following items from the grocery store.
    • 1 bag of  Udi's Gluten Free Plain Bagels (they're in the freezer section);
    • 1 box of frozen steak slices (like Steak Um's);
    • a few slices of your favorite cheese;
    • 1/2 of one red onion, diced. Skip this if you're not a fan of onions; and
    • A selection of your favorite condiments. 
    Cook and assemble as you would any other hot sandwich. Make sure that you toast the bagel first. Otherwise it won't be as tasty. The photo to the right really doesn't do justice to the deliciousness of this sandwich. I think it would have been better if I had put the cheese on the steak instead of on the bagel. Live and learn, right?

    You know what I love most about these bagels? How light and crispy they are. They still have the chewiness of a wheat bagel but they aren't as heavy. They're absolutely delicious. DH, Kiddo, and I have made our own versions of McD's breakfast sandwiches using these bagels. I really want to try the cinnamon raisin bagels. I love cinnamon raisin anything so as soon as I find these bagels I'm going to buy them and eat them.

    Has anyone made their own GF bagels? I'd be very interested to read about how you did it and how they turned out. Please comment here and tell me all about it.

    Don't forget the10th person to become a member of this blog gets a free box of Gluten Free Pantry's pizza crust mix. If you're the person who recommends the 10th person to join and they do, you get a free box of mix too.

    Tuesday, May 22, 2012

    News: Tax Deduction for Celiacs

    I came across this article this morning as I was searching for a strawberry rhubarb muffin recipe on celiac.com. The article discusses that in 2012 it is possible to deduct the extra cost of gluten free foods and products. For example; if you buy gluten free sandwich cookies that cost $8 and a package of non-gluten free sandwich cookies costs $3, you can write off $5. However, if there is a product that is gluten free but is not specifically marketed as such and you purchase the more expensive, specifically gluten free product you might not be able to deduct the cost difference. There is one other hitch to the program and that is that you have to be the one who is diagnosed as Celiac.

    It's also possible that the cost of the gluten free foods and products can be taken out of an eligible Health Spending Account. There are limits to the amounts needed to claim a deduction. Currently, the amount is $7,500. Which if you're regularly buying GF products you know that the costs can add up quickly and by the end of the year I have no doubt that you'll reach that $7,500.

    Beware though that in 2013 the article claims that there will be a few changes to the tax deduction program. The deduction amount will increase from $7,500 to $10,000. There are also other changes that are listed in the article that discuss medical deductions.

    To read the article from Celiac.com please click here.

    Celiac.org also provides information about tax deductions. click here

    I would love to know if anyone has any hints, tricks, tips for deducting your gluten free diet expenses.

    Monday, May 21, 2012

    Recipe: Strawberry Rhubarb Pie

    This weekend was another wonderful weekend. DH, Kiddo, and I hung out, watched movies, and visited with family. Saturday afternoon I decided that while DH was working on his car I would try to make a strawberry rhubarb pie. Up until Saturday I had never tried to make a pie crust from scratch. I also had never even touched rhubarb. I've eaten it but never worked with it myself. It's surprisingly simple and just as delicious as I remember it being.

    I should tell you that the reason I never thought about making a pie crust from scratch is because thought of making one myself terrified me. I had always heard how hard they are to make and that the crusts always shrink or crack. So, I took a deep breath and jumped right in. I thought that if the crust turned out terrible that the filling would probably still be edible. I can honestly say now that I am glad that I faced my fears. Not only did the crust not crack but it also didn't taste gluten free. Win!! If you've had the experiences that DH and I have had you've probably eaten a lot of dry, cardboard-y tasting pie and pizza crusts and breads. I give you my word that if you follow the pie crust recipe below you will have a wonderful pie crust that you can use for any pie.
    Strawberry Rhubarb Pie

    Pie Crust (adapted from Bob's Red Mill): 
    • 1-1/2 cups GF All Purpose Baking Flour 
    • 1/4 tsp xanthan gum + a little extra
    • 1/2 tsp Salt
    • 1/2 cup Margarine (one stick)
    • 1 Tbsp Vanilla (if you can, use the real stuff not the imitation)
    • 4 Tbsp Cold Milk 
    Instructions:
    • Combine flour and salt, then cut in margarine using a pastry blender until mixture resembles coarse meal. 
    • Sprinkle milk, one tablespoon at a time, while blending, until all ingredients are moist. Use only as much milk as you need to combine the ingredients.
    • Using wax paper, place dough onto one sheet, flatten with palm, place another sheet on top and roll out to desired size. Be careful not to roll the dough too thin or the next step will be tricky.
    • Remove the top sheet and invert into pie pan.

    Filling (adapted from Eat Better America):
    • 2 eggs
    • 3/4cup granulated sugar
    • 3tablespoons Gluten Free AP Flour. I used Gluten Free Mama's Almond Blend
    • 1/4teaspoon almond extract
    • 3cups coarsely diced fresh rhubarb
    • 2cups sliced fresh strawberries
    • 1/2cup packed brown sugar
    • 1/4cup Gluten Free AP Flour. I used Gluten Free Mama's Almond Blend
    • 2tablespoons butter, cut into pieces
    • 1/4teaspoon ground nutmeg 
    • 3tablespoons butter, cut into pieces
    Instructions: 
    It tastes better than it looks. I promise!
    • Heat oven to 375°F. In large bowl, beat eggs with electric mixer on medium speed until light. Beat in granulated sugar, 3 tablespoons flour and the almond extract until well blended. Place the 3 tablespoons of butter on the pie crust. Then, mix together the cut up strawberries and rhubarb then pour into crust-lined pan. Pour egg mixture over fruit.
    • In small bowl, mix brown sugar, 1/4 cup flour and the nutmeg. With pastry blender or fork (I do this part with my hands), cut in butter until mixture resembles coarse crumbs. Sprinkle over top.
    • Bake for 25 minutes then cover pie crust edges with a pie shield or tin foil. Bake for an additional 25 minutes or until crust is golden brown and filling is set in center. Cool completely, about 2 hours. Cut into wedges. Store in refrigerator.  
    Notes:
    There is no need to blind (pre) bake the crust. Especially if you bake it in a stone or ceramic pie pan. The bottom crust will turn out nice and golden along with the rest of it. 

    Keep an eye on your crust as the pie bakes. You don't want it over bake it as it will crumble as most GF items are wont to do. The edges of this pie did crumble a little bit.

    I hope you enjoy this pie as much as me and my family did. They liked it so much there was only one small piece left at the end of the day. If you have any questions please let me know. 

    Since I found this pie crust recipe so easy to make I just might make DH a French Silk Pie...his favorite.

    Until next time...

    Bon Appetite!

    Friday, May 18, 2012

    Product Giveaway & Recipe: Gluten Free Pantry Pie Crust

    In celebration of spring and the ripening of berries and other spring fruits I am giving away a box of Gluten Free Pantry's Pie Crust mix to the 10th person that joins the Gluten Free People blog (myglutenfreepeople.blogspot.com) and one box to the person that recommended that they join (if applicable). 

    To enter in the giveaway join the blog and comment on this page with your name (last name need not be included) and the name of the person who recommended you join. It's really that simple.  After all, who doesn't love a good pie? 

    * photo used from buy.com

    This weekend the family and I will be hanging out with my new in-laws and I plan to make a strawberry rhubarb tart. I love strawberries and I really like rhubarb so what could be better than putting them together in a delicious dessert? My best friend's mother makes a to-die-for strawberry rhubarb pie with a pretzel crust. It's sweet and salty and crunchy and delicious. I haven't had it in probably close to 8 years (and I miss it!). Since I'm not ready to try to tackle her pie recipe yet I'm going to try making a strawberry rhubarb tart. 

    I knew I picked the right family to marry into when my DH and in-laws said that they like rhubarb. Well, there are a myriad of other reasons they're wonderful but the liking of rhubarb, in my experience, is rare. Soooo with that in mind, I'm going to make a tart for them. Below is the recipe from Eat Better America. Of course, I have modified it to make it gluten free. 

    Crust:
    1 box of Gluten Free Pantry Perfect Pie Crust Mix - made according to the instructions.

    Filling:
    2      eggs
    3/4   cup granulated sugar
    3      tablespoons Bob's Red Mill Gluten Free all-purpose flour
    1/4   teaspoon almond extract
    3      cups coarsely sliced fresh rhubarb
    2      cups sliced fresh strawberries
    1/2   cup packed brown sugar
    1/4   cup Bob's Red Mill Gluten Free all-purpose flour
    2      tablespoons butter or margarine, cut into pieces
    1/4   teaspoon ground nutmeg 

    Baking Instructions:
    • 1 Heat oven to 375°F. In medium bowl, mix flour, salt and 1/4 cup oil with fork until mixture is consistency of coarse crumbs. Sprinkle with cold water, 1 tablespoon at a time, tossing with fork until all water is absorbed and dough sticks together. Shape pastry into a ball, using your hands. Press pastry in bottom and up side of 9-inch glass pie plate; flute as desired or press pastry to top edge of pie plate with fingers or fork.
    • 2 In large bowl, beat eggs with electric mixer on medium speed until light. Beat in granulated sugar, 3 tablespoons flour and the almond extract until well blended. Alternately layer rhubarb and strawberries into crust-lined pan. Pour egg mixture over fruit.
    • 3 In small bowl, mix brown sugar, 1/4 cup flour and the nutmeg. With pastry blender or fork, cut in butter until mixture resembles coarse crumbs. Sprinkle over top.
    • 4 Bake 50 to 60 minutes or until crust is golden brown and filling is set in center. Cool completely, about 2 hours. Cut into wedges. Store in refrigerator.
     Don't forget, the 10th person to join this blog and their co-conspirator each get a box of Gluten Free Pantry Perfect Pie Crust Mix.

    Bon Appetite!

    Wednesday, May 16, 2012

    Reminder: May + Amazon = GF Savings

    I know that there are tons of places that offer gluten free products and goodies. However, most stores only carry a small variety of gluten free products. To me, this is very frustrating because it means that I have to visit several different stores to find the products that I want. Let's be real, everyone is over-scheduled, over-worked, and stressed. Who really wants to drive around looking for the things they need? Not this gal. 

    This is why I am such a staunch supporter* of buying the gluten free things that my family needs from Amazon. My Amazon Prime membership has more than paid for itself in the last couple of months. PLUS now through the end of May Amazon is offering discounts between 5-15%. Click here for more details. I haven't done the subscribe and save thing yet but I fully intend to once DH and I move and get settled into our new place. 

    If you have tried the subscription service please comment and let me know what you think of it. Is it worth it? Would you recommend it? 


    * I am in no way compensated for saying these nice things about Amazon or it's programs. I'm just a really big fan of them.

    Tuesday, May 15, 2012

    Gluten Free Pizza & Dominos Follow-up

    Sorry about the delay in posting. Fiance and I got married last weekend and there was very little time for blogging. I hope you understand. In honor of our marriage, Fiance will now be called Husband, Hubby, or DH (Dear Husband). My new buddy and step-son will be called D-Man or Kiddo.

    Before we left for the wedding we made a GF pizza. We made the crust from the Chebe Pizza Crust mix. Like all the other mixes this one was really simple to make and only needed a few extra ingredients. I suppose that you could add some yeast to the dough if you wanted a thicker crust. I didn't for this first round but I will definitely try it on the next go 'round. If you have tried adding yeast to the pizza dough will you please comment and let me know how it turned out? 

    There is no pre-baking of the pizza crust needed. You will need some kind of pan to bake it on though. For the toppings we used a store bought pizza sauce, shredded mozzarella (of course. Pizza isn't complete with out the mozz!), shredded Monterrey jack, green peppers, onions, and leftover rotisserie chicken. DH loved how this one turned out. Like me, he's a pizza lover. Pizza was one thing that he sorely missed since being diagnosed. Well, I think we just found his replacement pizza!! Thanks Chebe!!!!


    There are several wonderful reasons to make your own pizza...
    1) You don't have to wait for it and hope that they got the toppings right;
    2) You can put whatever you can think of on it; and
    3) It doesn't cost a small fortune (unless you pick pricey toppings).

    Speaking of spending a small fortune we decided to try the new Domino's GF pizza last night. I know that they warn that the GF pizza is not for people diagnosed with Celiacs but we decided to chance it anyway. DH asked another person we know who is also Celiac whether or not they had any issues with it. They did not so we decided to go for it. 

    The pizza was actually delicious. The crust was really good and not at all cardboard like. We added the robust tomato sauce and DH's favorite toppings (Italian sausage, green peppers, and onions) to it. I have to say that I was really surprised. My only gripe is that the pizza is really small. It basically comes in an extra small. I thought a 10" pizza would be enough to feed DH, Kiddo, and I but I was really wrong. Good thing we ordered another pizza. If you have a group of people you will be feeding I recommend ordering 1 GF pizza for each person with gluten sensitivity and another pizza for everyone else.

    I double checked with DH this morning and so far he has not had any issues with it. My personal review is that it's a really good pizza and I do recommend it but with reservation. If you are really concerned about having a reaction to the pizza please do not order it. Like I said in my first post, I am not an expert and do not want to cause anyone else to have troubles.

    Let me know your thoughts on either the Chebe Pizza Crust mix or the Dominos Pizza. If you have any suggestions or other products I'd love to know about them.

    Tuesday, May 8, 2012

    News: Dominos Goes GF

    Domino's, gluten-free, gluten sensitivityMy best friend, PIC, sent me an article yesterday that said that Dominos (the national pizza restaurant) will soon be offering gluten free pizzas. When I first saw the title I was overjoyed. Finally, Fiance would be able to eat delivery pizza again. YAY!! But my joy was short lived. I read the article and am excited that people with a gluten sensitivity can enjoy pizza from this beloved national chain but am bummed for Fiance since Dominos warns Celiacs that it's not for them.

    The Dominos crew have been trained on the basics but because kitchen practices still need to be adjusted they cannot recommend this product to anyone who has Celiac Disease. Hopefully they figure out a way to get the kitchens up to code so that Celiacs can enjoy this pizza also.

    To read the article please click here.

    *image taken from Dominos article.

    Product: Chebe Garlic & Onion Breadsticks


    Earlier this week after we tried the Chebe cinnamon rolls and decided that they were pretty darn awesome, I decided that I needed to make the garlic & onion bread-sticks. This mix came in the variety pack that I ordered last week from Amazon. Still haven't joined Amazon Prime yet? Well, what are you waiting for? No, I haven't been paid by Amazon to encourage you to join the program. I am just a really strong believer in it.

    Last night Fiance made chicken alfredo with GF penne pasta. I can't remember what kind of alfredo sauce he used but it was delicious. Since he was doing the actual cooking of the dinner I figured that I could whip up these bread-sticks. Once again, the package instructions were easy to follow. The bread-sticks took next to no time to mix together and only about 18 minutes in the oven. 

    Like the cinnamon roll mix you will need some extra ingredients. I added shredded Italian cheese to my mix. I also added a bit more than the recipe called for. After all, who doesn't love cheesy bread-sticks? No one I know, that's for sure.

    Once the bread-sticks were finished I brushed some butter spread on them. My favorite butter spread is Brummel & Brown. It's made with yogurt. Win-win for everyone. The health benefits of yogurt with a buttery taste. So good. The parchment paper in the picture looks greasy but that's not because of the bread-sticks. That's because of the butter spread. 

    I have to admit that I was a bit surprised with these bread-sticks. They were pretty crunchy on the outside and really soft on the inside. I worried that I hadn't cooked them through but I think it was all the cheese that I had put in them. The package said to make twelve bread-sticks so I did...and between me, Fiance, and D-Man we ate them all. These bread-sticks are light, crunchy, chewy, cheesy, and delicious. 

    It's official, we are definitely sold on the Chebe bread mixes. We will be ordering more of these and very very soon. I'm not sure which one we'll try next but please stay tuned....

    Oh Fiance and I are getting married this weekend. Our cake is going to be gluten free. I'm really looking forward to it. I hope that it's as good as the cupcakes Sweetz Bakery in Sterling, VA. I'll post a review of the cake and bakery after I get back from the wedding next week. So until then....

    Bon Appetite!

    Monday, May 7, 2012

    Product: Chebe Bread Mixes (the review)

    Since yesterday was a sleepy, cloudy day I decided that it was a good day to make some gluten free cinnamon rolls. Last week I ordered the Chebe dry mix variety pack from Amazon. I was a little surprised when they arrived. The boxes of mix were smaller than I thought they'd be. I'm not sure why I was expecting larger boxes. I like that the packaging was small and relatively simple.

    The instructions on the box were really straight forward and easy to follow. Do read them carefully before you start putting these together. You will need additional ingredients such as; milk, butter, eggs, and oil. Thankfully because of the reviews on Amazon I had already counted on needing extra ingredients.  Another thing that I recommend is adding yeast to the mix. A few other reviewers had recommended this as well. I had planned to add some when I made them but I forgot. I was so focused on making the dough correctly that it completely slipped my mind (it happens to me all the time.)

    If you have a nose like mine you will notice that the cinnamon roll dough smells exactly like the finished product while you're still mixing it. It smells delicious and the raw dough tastes pretty good too. I'm sure that tasting the raw cinnamon roll dough sounds strange to some of you but it's how I can determine if the finished product will taste the way it should. The cinnamon rolls smell even better while they are baking! They give the house a warm and yummy fragrance.


    I followed the instructions on the package to a tee. I usually do the first time I make something. After that I will tinker with it to see if I can make "improvements" to it. I baked mine in a muffin tin for about 17 minutes. I did that because Fiance doesn't like the center of his cinnamon rolls to be ooey gooey. I think that's a little nutty too but I still love him ;-)  The packaging says to bake them up to 18 minutes. They were delicious even though they didn't rise. The rolls were cooked through but still chewy. Fiance suggested that next time I add the yeast and then put a glaze on them. I think that glazing them is a great suggestion. After all, who doesn't love the icing on a cinnamon roll?

    Bottom line: My family and I love these cinnamon rolls. This is another example of a gluten free product that tastes exactly like it's wheat counterpart. Your family or guests won't know that they are missing the wheat unless you tell them. I highly recommend this product...just add the yeast.

    Next I plan to make the garlic and onion bread sticks. Stay tuned for the review.

    As always, if there is a product you love or would like for me to test for you please let me know what it is and I will give it whirl.

    Bon Appetite!

    Thursday, May 3, 2012

    Product: Chebe Bread Mixes

    I received an email this morning from Amazon highlighting some gluten free products. Items like pizza crust mixes, GF Bisquick, granola bars, and other such items. They were also advertising their subscription service and the discounts that go along with that. The discounts aren't spectacular but after awhile the savings will stack up. After all, a penny saved is a penny earned...right? 

    Anyway, I was poking around on Amazon (I do this almost daily) and I came across a cinnamon roll mix. I did a double take, clicked on the image and read some of the reviews on it. The majority of the reviews raved about Chebe's cinnamon roll mix. The few that offered only one or two stars say they were disappointed because the cinnamon rolls didn't taste like the wheat rolls they remembered. No one said they tasted terrible. So, that's good enough for me. 

    Chebe also makes other mixes such as bread sticks, pizza dough, sandwich bread, cheese bread, and focaccia. I am a carbivore and love anything that has to do with bread and dough. Given that, I am very anxious to find a good GF bread mix that will allow me to continue to be GF in support of my Fiance and still eat bread. I know that my Fiance misses bread too. Hopefully Chebe's mixes won't let us down. Fortunately they make a variety pack that includes all six of these mixes. I will be ordering this pack today. Stay tuned for the verdict...

    *Image taken from Chebe.com

    Wednesday, May 2, 2012

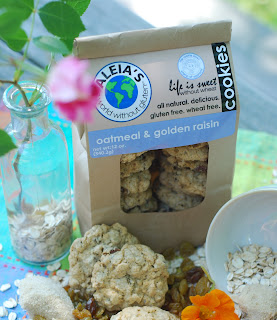
    Product: Aleia's Gluten Free Cookies

    I was perfectly fine with going gluten free to support my wonderful Fiance until I realized that meant that I would either have to cut out some of my favorite treats, like oatmeal raisin cookies, or making them myself. I love to bake so it's not really a problem for me to bake up a batch of cookies. However, let's face it, sometimes I just want the instant gratification of simply opening a package of cookies.

    If you're new to the GF world then you're probably staring at the shelves of goodies at the grocery store feeling frustrated. Fret not my friends! I have a solution. That solution is Aleia's Gluten Free Cookies. I found these little rounds of goodness while I was at my grocery store one night stocking up on the staples. Like me, my Fiance loves oatmeal raisin cookies but hasn't had them in a long time because of the wheat. When I saw these cookies on the shelf fireworks went off. Then I saw the price. At $7.99 a bag I almost passed out. That seems like an awfully big price to pay for a product I wasn't sure would be worth it.  I'm not very comfortable spending gobs of money on things I'm not sure I'm going to like. If I like it then it's worth the price. If I don't like it then I've just wasted money. I don't like wasting money but really, who does?

    So I stood there and struggled with my inner accountant. Finally after a short contest my sweet tooth won and I grabbed a bag of the oatmeal raisin cookies. I have just three words for you...O.M.G! these are the most amazing cookies ever packaged. They aren't one bit dry or gross. Not even after the package has been opened a few days. Which if you've been GF for awhile you know that can be a problem. These cookies also taste like they're homemade. Believe me when I tell you that they are worth the price.


    I found the cookies at Giant in the GF section. Yes, my Giant has a GF section complete with it's own freezer case. Isn't that great?! I've also seen these cookies at my local Safeway. I'll keep looking around for them and let you know where else they pop up. So far, Giant is my go-to place for GF products because they make it easy and convenient to find some of the specialty items I want and need. If your local grocery store doesn't carry GF products, or only carries a very small selection, visit your local store manager in person and tell them that you'd like to see the store stock these products. I know that doesn't like something you want to do but trust me, they want your business and they want to stock things they know people will buy.  In this case the squeaky wheel will definitely get the grease.

    If you find any delicious GF treats let me know what they are and where to find them.

    There are also some pretty tasty looking recipes on Aleia's blog that I can't wait to try out.

    As they say...Life is Sweet!*

    Shannon

    *Image used with permission from Aleia's